Why Craft Your Own Arrows?

The arrow can be more than just a way to hit a target; it can become an extension of your own skill. At OneX Archery we see that many archers eventually feel that mass-produced arrows don’t really cut it. Fletching your own arrows fills the gap between off-the-shelf gear and a setup built exactly for you. When you take charge of your arrow’s design, you get to match your arrows to your shooting style, bow traits, and performance goals.
Crafting Your Perfect Arrow
Learning to fletch your own arrows lets you customize them in ways that store-bought ones never can. Every archer has personal needs based on factors like bow weight, draw length, and the shooting environment. By picking your fletching patterns, sizes, and materials, you create arrows made for your gear, which helps your arrows group tighter and fly truer.
"There is magic in custom fletching when you can experiment and fine-tune each arrow."
| Fletching Style | Drag and Flight Stability | Ideal For | Main Trade-Offs |
|---|---|---|---|
| Helical (3-5°) | High spin, top stability | Broadhead hunting, short-range accuracy | Slight speed loss |
| Offset (2-3°) | Moderate rotation, balanced flight | All-purpose target and field shooting | Minimal drag increase |
| Straight (0°) | Fast arrow speed, least drag | Long-distance target competitions | Less corrective spin |
There is beauty in crafting your own fletching because you can experiment until you find the perfect setup. Maybe you need arrows with strong helical fletching for hunting, where extra stability at close range is crucial. Or you might prefer a low-profile, straight design for blazing speed in competitions. Once you master arrow customization techniques, you can leave behind the limitations of off-the-shelf arrows. If you use a compound bow, custom fletching brings your arrows and stabilizer weight system into perfect harmony. The bounce of your bow, the way your weight is balanced, and the arrow’s flight all work as one team. When you control every fletching detail, you finish the tuning that began with a well-balanced bow.
Saving Money and Enjoying the Experience
A big plus of fletching your own arrows is that it can really lower your archery costs over time. Even though you need to spend a bit on supplies and tools at the start, each arrow then becomes much cheaper than buying pre-made ones. Remember that OneX Archery focuses on stabilizer weights and does not offer fletching supplies or tools. If you shoot a lot, these savings add up pretty fast. A good fletching jig might cost the same as 12-15 premium pre-fletched arrows, but it will help you build hundreds or even thousands of arrows over time, making it a smart investment.
There is also a deep joy in making your own arrows. Watching an arrow you fletched fly straight to the target gives you a real sense of achievement and a connection to a tradition that goes back thousands of years. It feels really good to improve your archery accuracy by crafting your own gear instead of merely buying what is available. Many archers find that fletching turns into a calming, meditative hobby. Spending an evening at the workbench building half a dozen arrows can serve as a peaceful break from a tough practice session, and many tell us that this time becomes valuable thinking time to reflect on their shooting style and plan their next moves. What starts as a practical skill often grows into a cherished part of your archery journey.
Getting Your Supplies: What You Need
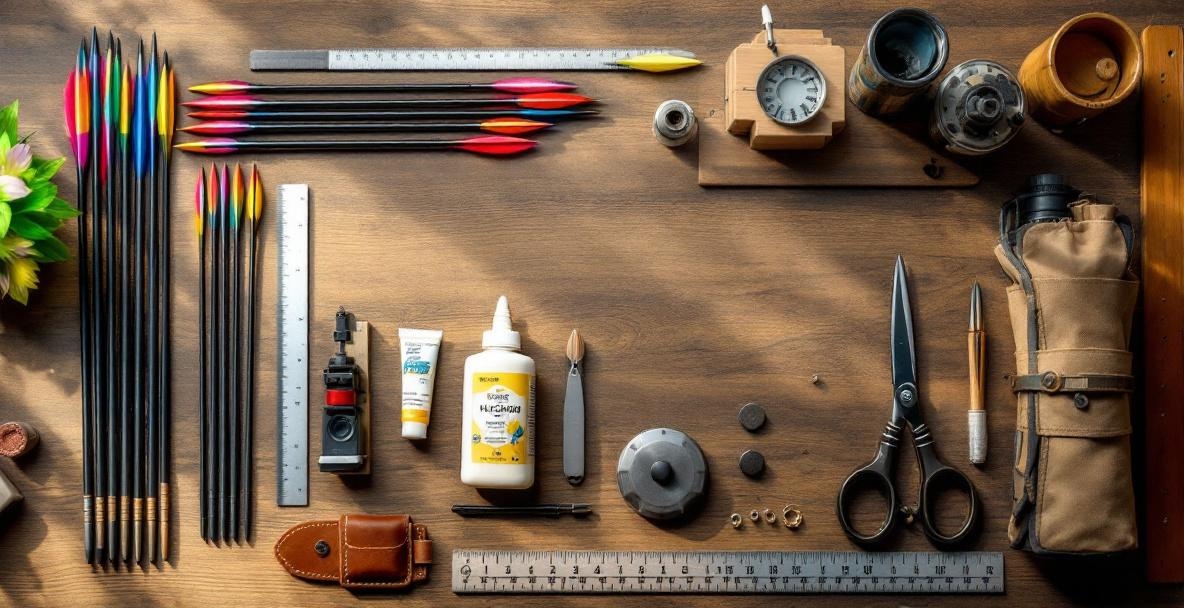
Before you start putting together your own arrows, you need to gather the right tools and parts. Having the right gear makes building arrows much smoother and more fun. Here we go over all the basics you need to kick off your fletching adventure, from the must-have tools to the different types of fletchings and shafts.
Must-Have Tools
A good fletching jig is the heart of any arrow-building setup. It holds your arrow shaft and fletchings carefully in place while the glue sets so that everything lines up just right. Choose a jig that lets you adjust the helical settings so you can get the perfect spin on your arrows for a great flight. The best jigs cost between $30 and $150, with the pricier ones offering more precision and durability.
"Building arrows takes care and patience. The right tools cut down hassle and give great results."
Next to your jig, grab some adhesives made for fletching. For vanes, Cyanoacrylate (super glue) works fine, but feathers usually need a special fletching glue or epoxy. Also, make sure you have cleaning supplies like isopropyl alcohol and cotton swabs for prepping surfaces for maximum adhesion. Helpful extras are fine-grit sandpaper to rough up the shafts, a sharp knife or trimmer for fletching, and a straightener to fix any shafts that aren’t perfectly straight before you begin. Don’t forget your measuring tools – a ruler or caliper helps keep things even, and a scale will check arrow balance after you’re done. Serious archers might also pick up a fletching stripper for taking off old fletchings when refurbishing arrows. Remember, building arrows right takes time and care, and great tools make it easier.
Picking Your Fletchings
You have two basic choices for fletchings: traditional feathers or modern plastic vanes. Feathers, usually from turkey wings, give great stability and fix themselves when they hit the arrow rest. They are a hit with traditional archers and those who shoot with recurve bows, but they don’t last as long as vanes and don’t do well when wet.
"You can choose between classic feathers and modern plastic vanes, each with their own strengths."
| Fletching Style | Drag and Flight Stability | Ideal For | Main Trade-Offs |
|---|---|---|---|
| Helical (3-5°) | High spin, top stability | Broadhead hunting, short-range accuracy | Slight speed loss |
| Offset (2-3°) | Moderate rotation, balanced flight | All-purpose target and field shooting | Minimal drag increase |
| Straight (0°) | Fast arrow speed, least drag | Long-distance target competitions | Less corrective spin |
Plastic vanes, crafted from flexible polymers, are now a common choice because they are durable and weatherproof. They are available in many sizes, shapes, and colors to match your shooting style. Smaller vanes under 2 inches trim down drag and keep up speed for target shooting, while bigger vanes between 2 and 4 inches offer more stabilization for hunting arrows with broadheads. Profile height matters too: low-profile vanes reduce wind drift but do little to correct flight, whereas high-profile vanes add drag but help steady inconsistent shots. When you choose fletchings, think about your archery needs and shooting conditions. For indoor contests, larger high-profile fletchings can give you extra stability, and for outdoor, long-distance shots, the smaller, sleek vanes reduce wind drift. At OneX Archery we suggest trying different set-ups to see which one fits your bow and style best.
Picking Arrow Shafts
Arrow shafts are made from different materials, and each has its own features. Aluminum shafts stay straight, are pretty durable, and offer good value. They come in exact diameters and weights, which makes them a solid choice for target shooting. However, they can bend if they hit something hard and are heavier than carbon alternatives.
| Shaft Material | Weight and Consistency | Durability | Cost | Ideal For |
|---|---|---|---|---|
| Aluminum | Heavier, reliable | Can bend on hard impact | $$ | Target shooting and beginners |
| Carbon | Lightweight, fast | Excellent impact resistance | $$$ | Hunting and competitive target |
| Carbon-Aluminum Hybrid | Best weight balance | Superior straightness and longevity | $$$$ | High-performance setups |
Carbon shafts have changed archery with their light weight and strength. They don’t bend easily and can hold their shape even after heavy hits. Because carbon can be built into thinner shafts, they enhance penetration for hunters. The catch is that good-quality carbon arrows can be costlier than aluminum, and cheaper carbon ones may splinter badly if damaged.
For the best of both worlds, carbon-aluminum hybrid shafts mix an aluminum core with carbon fiber on the outside. These specialized shafts deliver optimal weight balance while giving you the straightness of aluminum and the toughness of carbon. They sit at the premium level, but their performance is worth the extra cost for dedicated archers. When choosing shafts, look at factors such as spine, weight, diameter, and how straight they are since these impact arrow flight and need to match your bow.
Step-by-Step Guide: Fletching Your First Arrow
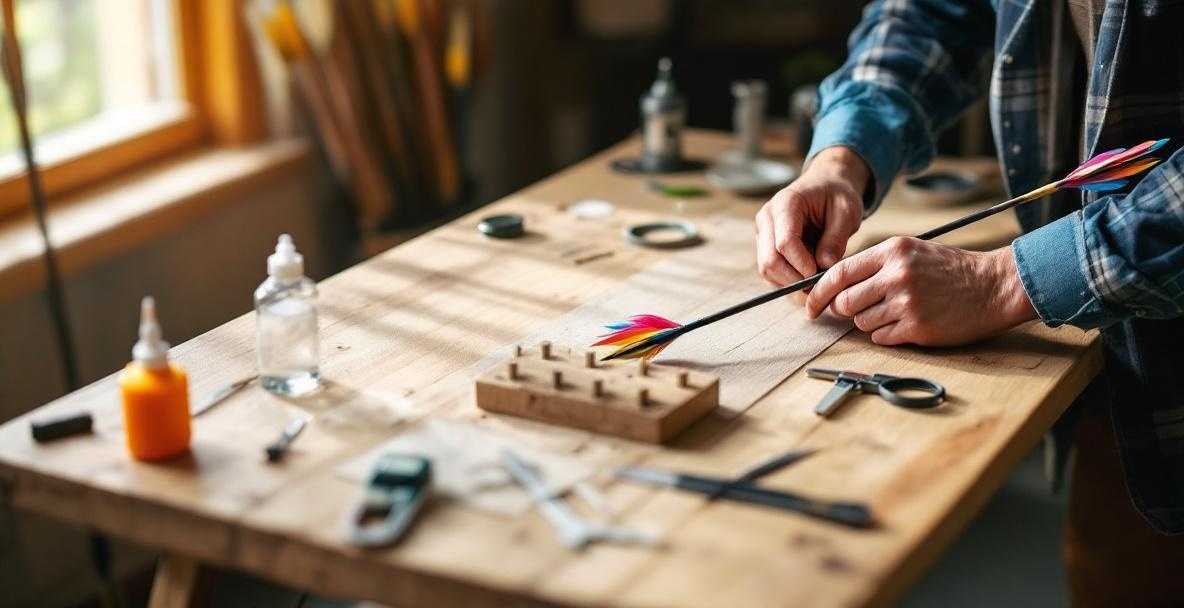
With your supplies ready, it is time to get hands-on and start fletching your very first arrow. Even if it’s your first try, don’t worry; at OneX Archery we know that anyone can get great results with a bit of guidance. Just follow each step carefully and be patient. Keep in mind that getting your fletching right makes your arrows fly steadier, just like our precision-engineered stabilizer weights make your bow perform better. Let’s go through the steps in detail.
Getting the Shaft Ready
Before you add any fletchings, you have to prepare the shaft properly so that the glue sticks well and lasts long. First, clean the arrow shaft thoroughly using denatured alcohol or acetone. This step gets rid of oils, fingerprints, and any leftover residues that might weaken the glue bond. Use a lint-free cloth so that no fibers are left behind.
After cleaning, mark where you will place the fletchings on the shaft. For a standard three-fletch layout, use a pen to mark the shaft at 0°, 120°, and 240° starting from the nock. If your jig has indexing, that can make this step a lot easier. For the arrow to fly consistently, keep at least 1 to 1.5 inches clear from the nock before you start your fletching.
If you use carbon arrows, lightly sand the area where you will attach the fletching with fine-grit sandpaper. This gives a rough surface that helps the glue stick better. Aluminum shafts usually don’t need sanding, but make sure they are spotless. After sanding, wipe the shaft again with alcohol to clear off any dust and let it dry completely before moving on to the next steps in the fletching process.
Setting Up and Sticking Your Fletchings
Getting the alignment right is where your jig comes in handy. Put your arrow shaft into the jig and make sure the nock sits in the right spot. Most jigs come with a clamp that keeps the vane or feather exactly where it should be. Place your very first fletching – usually the cock feather, which might be a different color – at the 0° mark, making sure its front edge points toward the arrow tip.
Apply a thin, even line of adhesive along the base of your vane or feather. Too much glue makes a mess and adds weight, and too little means it won’t stick well. Put the fletching in the clamp, close it, and let the glue set as the instructions say, usually between 2 and 5 minutes for quick sets and longer for others. Take your time here because setting it up right makes a big difference in accuracy, just like our balanced stabilizer weights help with shooting consistency.
For the other fletchings, rotate your jig to the next mark (120° for a three-fletch or 90° for a four-fletch) and repeat the same steps. Keep the spacing and angle the same for every vane. If you're making lots of arrows, you might want to work in batches – put on the first vane on each arrow, then add the second vane, and so forth. This method gives you enough time for the glue to set between coats.
Making Sure the Fletchings Stick
Once you’ve attached all your fletchings, check each one to see if any parts are not sticking well. Look for gaps between the fletching base and the shaft, especially at the front and back edges, because those can lift during flight. If you notice any gaps, use a toothpick to apply a little extra adhesive to those spots. Let your arrows cure fully before you use them. Even if the glue feels dry in a few minutes, it usually needs 24 hours to cure properly for full strength. During the curing period, keep the arrows horizontal and turn them from time to time so the adhesive does not flow. Store them in a room-temperature place away from direct sunlight for the best cure. For extra strength, especially on plastic vanes, you might put a light coat of clear nail polish or a special fletching sealer on the base edges once the glue is cured. This adds a layer of protection against moisture and knocks, which can lengthen the life of your fletching. Just like our customizable weight systems let you adjust to different conditions, these final steps help your fletching hold up no matter the weather.
Fixing Common Fletching Problems

Even the best fletchers run into issues sometimes. At OneX Archery we have helped many archers and gathered tips for the most common fletching hiccups. Fixing these issues not only helps your arrows fly better, it also boosts your overall performance. Just like our stabilizer weights fine-tune your bow, these tips will help you perfect your fletching.
Awkwardly Aligned Fletchings
If your fletchings end up crooked, your arrow flight and accuracy can suffer and every shot might feel off. This can happen if your jig isn’t set up right, if you rush the process, or if you don’t apply even pressure while the glue is setting. Before you start, double-check that your jig is calibrated and that the arrow shaft is properly in place. If you notice the fletchings are misaligned after you build the arrow, you will need to remove them and try again. You can use a fletching stripper or gently apply acetone with a cotton swab to melt the glue without harming the shaft. Clean the shaft thoroughly before you put on new fletchings. For best results, mark the shaft before placing it in the jig so it always lines up the same. This small detail is as important as setting up your stabilizers or other gear correctly as shown in this guide.
Glue That Won't Hold
Few things are as annoying as fletchings that come off during shooting or transport. If the glue doesn't hold, it might be because the shaft wasn’t cleaned well, the adhesive wasn’t right, or it didn’t have enough time to set. Always clean your arrow shaft with isopropyl alcohol first to get rid of oils, dirt, and fingerprints that stop the glue from sticking. The glue works best in the right temperature and humidity. Most fletching glues do best at 65 to 75°F and in moderate humidity. If it’s not ideal, try giving the glue 25 to 50% more time to set. For carbon arrows, lightly sand the area where you’ll attach the fletching to give the adhesive more grip. This care in preparing your shaft leads to better reliability, much like our precision-engineered weights give consistent results.
Getting the Arrow Balanced
If your arrow doesn’t fly right, it could be because the fletching setup is off balance. Where you put the fletchings, their size, and type all affect how the arrow flies. If your arrows sway or wobble in the air, you might need to tweak your fletching setup. Make sure the three fletchings in a typical setup are spaced evenly at 120 degrees around the shaft. Heavier fletchings make the arrow more stable but slow it down, while lighter ones keep speed but might not stabilize as well. For beginners, when learning how to fletch arrows, try using fletchings that are a bit larger (2.5 to 3 inches) because they are more forgiving. When you get better, you can try smaller and sleeker options. Think about what your arrow is meant for – target arrows may need different fletching than hunting arrows. Just like our stackable weight system lets you customize your balance, your fletching should match your needs. If problems persist, try rotating your fletchings by 2 to 3 degrees. A small offset can give the arrow a stabilizing spin without adding too much drag. Keep in mind that finding the perfect balance takes time and testing various setups until you discover what works best for you.
Finishing Up: Next Steps in Crafting Your Arrows
Great job! You have now mastered the basics of arrow fletching. This skill not only cuts costs but also connects you with the deep heritage of archery craftsmanship. As you hone your fletching skills, you’ll see that small tweaks can make a big difference in your shooting. At OneX Archery, we have seen that building your own arrows helps you understand your gear and choose the best setup.
Looking Back on Your First Fletching Session
Shooting an arrow that you crafted yourself is a truly special moment. You feel a sense of pride watching your handiwork hit the mark. Spend time noting down your first fletching session, take some photos, and jot down what worked and what you would adjust for next time. This kind of reflection is priceless for growing as both an archer and a craftsman.
Many tell us that making their own arrows brings them closer to the sport. They start to see small differences in flight that they never noticed before. This new insight often leads to better shooting technique and accuracy, because you understand how every part affects your shot. Maybe start a fletching journal where you record the different setups and how they impact your performance.
It might feel tough at first, but even master fletchers began just like you. Every arrow will be an improvement, and soon you’ll even get into a rhythm that feels almost meditative. Embrace the early mistakes because they are great teachers on your journey to mastery.
Diving into Advanced Fletching Techniques
After you get the hang of basic fletching, many more customization options open up. Try out different vane sizes, shapes, and materials to build a better arrow that suits your style. Helical fletching gives the arrow more spin and stability, but adds drag, while straight fletching has less drag but doesn’t stabilize as much. Finding the perfect mix is all part of the adventure.
Another fun option is arrow cresting, where you add decorative bands or patterns that make your arrows unique and easy to spot. Custom wraps under your fletching can give your arrows a professional look and make them truly yours. You might even try customizing your nocks with different colors that blend with your fletching or add extra visibility. If you want to go further, learning to build complete arrows from raw shafts is the next step. This process involves cutting shafts to the right length, placing inserts, and picking point weights that work with your bow. Having control over every part of your arrow lets you build projectiles that work perfectly with your stabilizer weights and overall setup.
Get Involved in the Community
The archery community is very friendly to DIY fans. Websites like Archery Talk and Traditional Bowyer's Bible Forum have special sections for building arrows, where you can share your work, ask questions, and learn from seasoned fletchers. Social media groups let you connect with arrow makers from all over the world. Many local clubs hold fletching workshops or have members eager to share tips. Meeting people in person can speed up your learning and show you tricks not found online. Don’t hesitate to bring your handmade arrows to the range, as they are excellent conversation starters and might even inspire others to try fletching.
Knowing every detail about your gear makes your performance better. That is why we encourage archers to try out different equipment combinations and share what they learn. The insights from making your own arrows work hand in hand with the precision of our stabilizer weights, raising your archery game to the next level.
Ready to take your archery to the next level with both crafting skills and premium equipment? Visit OneX Archery today to explore our precision-engineered stabilizer weights that will complement your custom-fletched arrows and help you achieve the perfect balance and stability for your shooting style.
Leave a Reply